วิธีการเชื่อมต่อ Gmail ใน Wisible ด้วยการยืนยันแบบสองขั้นตอน
สำหรับใครที่ใช้ระบบ email ของ Google ทั้ง Gmail หรือ G-Suite สามารถเชื่อมต่อ Wisible กับ Google Mail ได้ โดยมีขั้นตอนหลักๆ 3 ขั้นตอน ดังนี้ 1.…
สำหรับใครที่ใช้ระบบ email ของ Google ทั้ง Gmail หรือ G-Suite สามารถเชื่อมต่อ Wisible กับ Google Mail ได้ โดยมีขั้นตอนหลักๆ 3 ขั้นตอน ดังนี้
- ตั้งค่าเปิดการใช้งาน IMAP
- ตั้งค่าเปิดการใช้งาน 2-Step Verification*
- ตั้งค่าเปิด App Passwords
- Sync email กับ Wisible
*กรณี G-Suite ให้ติดต่อ G-Suite Administrator เพื่อทำการเปิด 2-Step Verification และ Less Secure Apps (เพื่อรองรับการใช้งาน IMAP) ก่อนการใช้งาน
1. ตั้งค่าเปิดการใช้งาน IMAP
เนื่องจาก Wisible ใช้การเชื่อมต่อ email แบบ IMAP ต้องเปิดการใช้งาน IMAP ก่อนการใช้งานโดยมีขั้นตอน ดังต่อไปนี้
- เข้า Gmail
- มุมขวาบน กดปุ่ม Setting (รูปเฟือง) มีหน้าต่างเปิดขึ้นมา กด Setting
- กดที่ Tab Forwarding and POP/IMAP
- เลือกหัวข้อ IMAP access เลือก Enable IMAP (ถ้าพบว่า Enable อยู่แล้ว ก็ข้ามไปขั้นตอนที่ 2)
- กด Save Changes
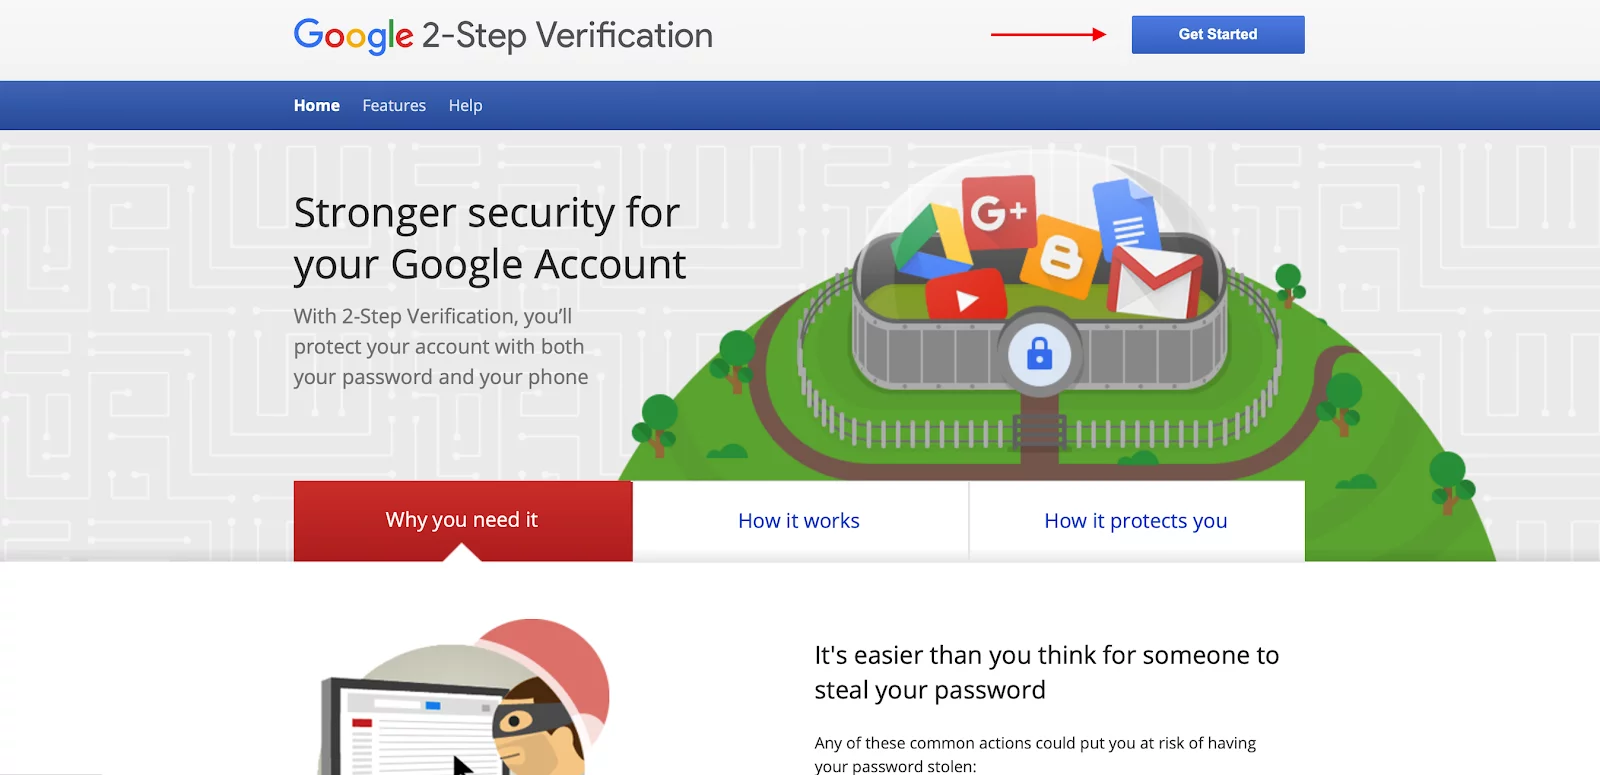
2. เปิด 2-Step Verification หรือการยืนยันแบบสองขั้นตอน
เพื่อเพิ่มความปลอดภัย ป้องกันบุคคลไม่หวังดีแอบเข้ามาใช้งานอีเมล์ของเรา เราสามารถเปิดการใช้งานการยืนยันแบบสองขั้นตอนได้ โดยมีขั้นตอนดังต่อไปนี้
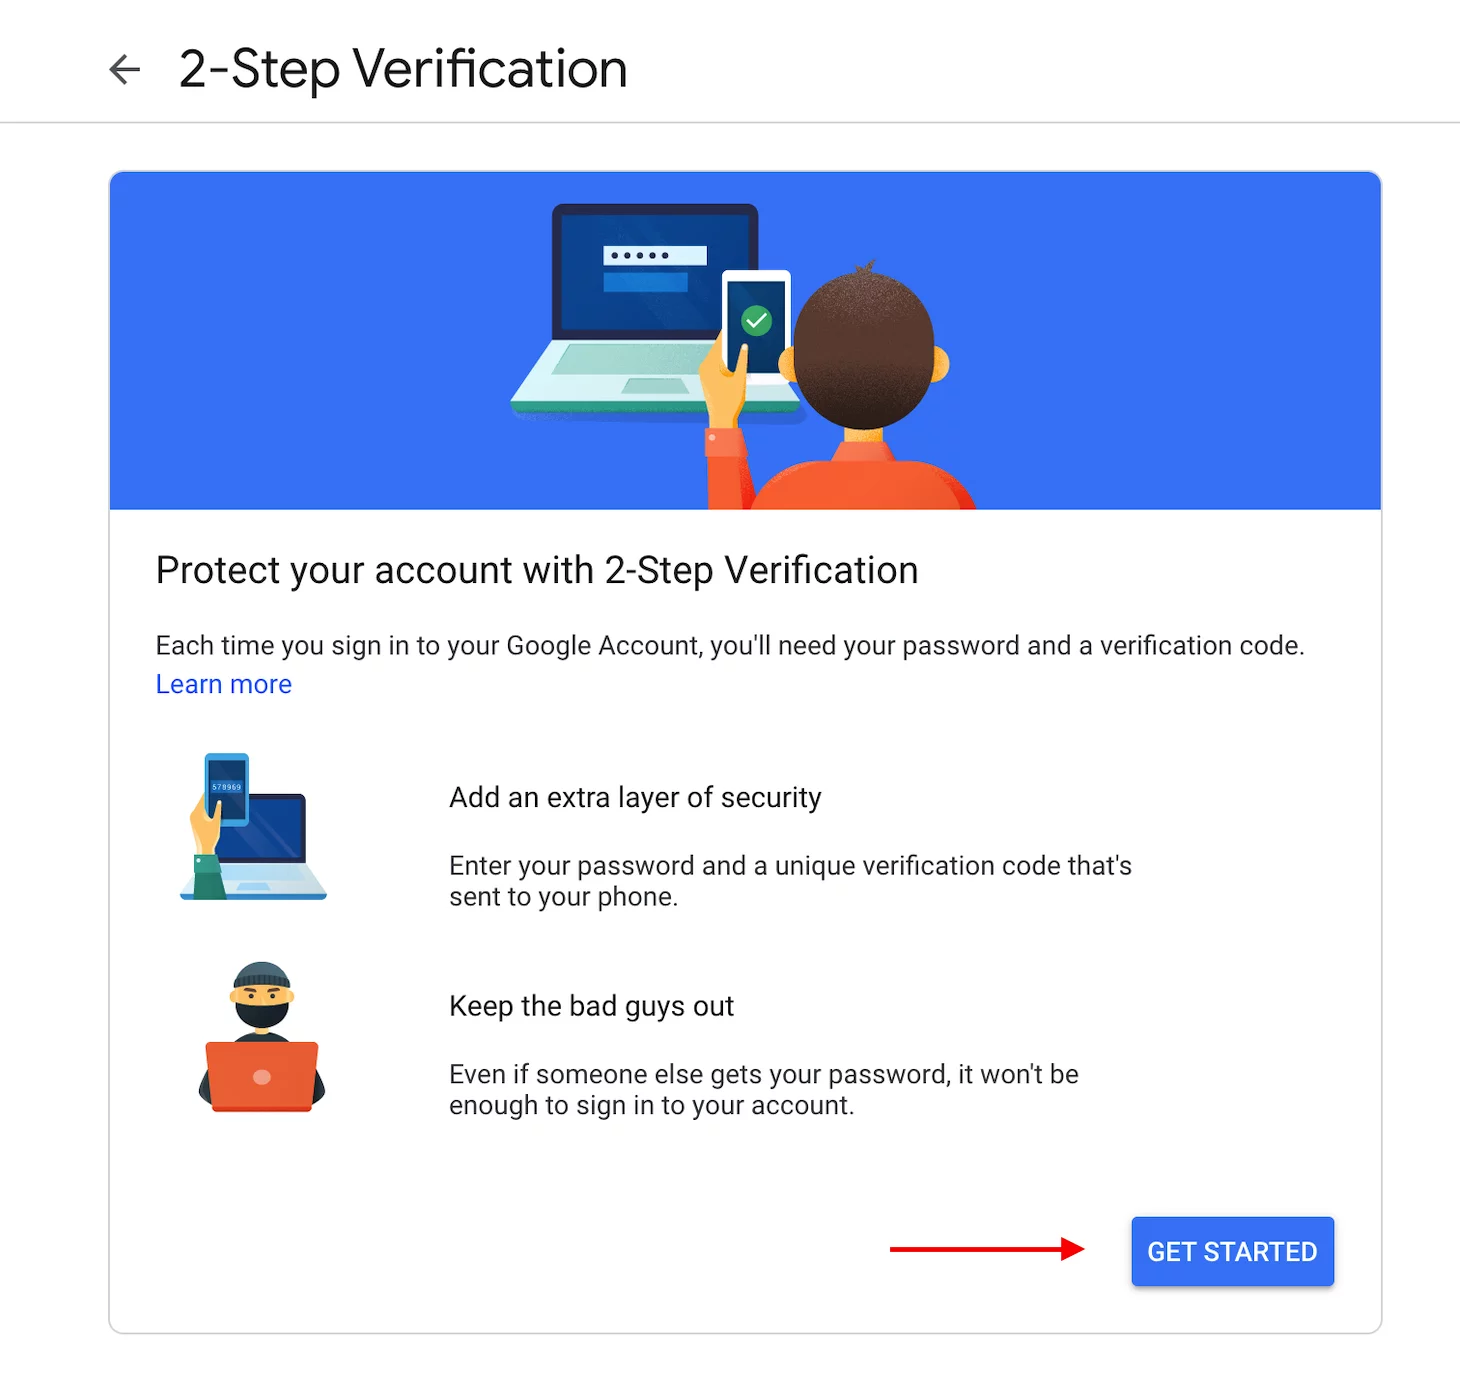
- เข้า Google การยืนยันแบบสองขั้นตอน
- คลิ๊กที่ปุ่ม Get Started เพื่อไปขั้นตอนถัดไป
- คลิ๊ก GET STARTED หรือ เริ่มต้นการใช้งาน
- Sign in เข้าบัญชี Gmail เพื่อเปิดใช้งาน ให้ใส่เบอร์โทรศัพท์มือถือของท่าน เพื่อรับ Code ให้เลือกแบบ “ข้อความ” แล้วกดปุ่ม Next หรือ ถัดไป
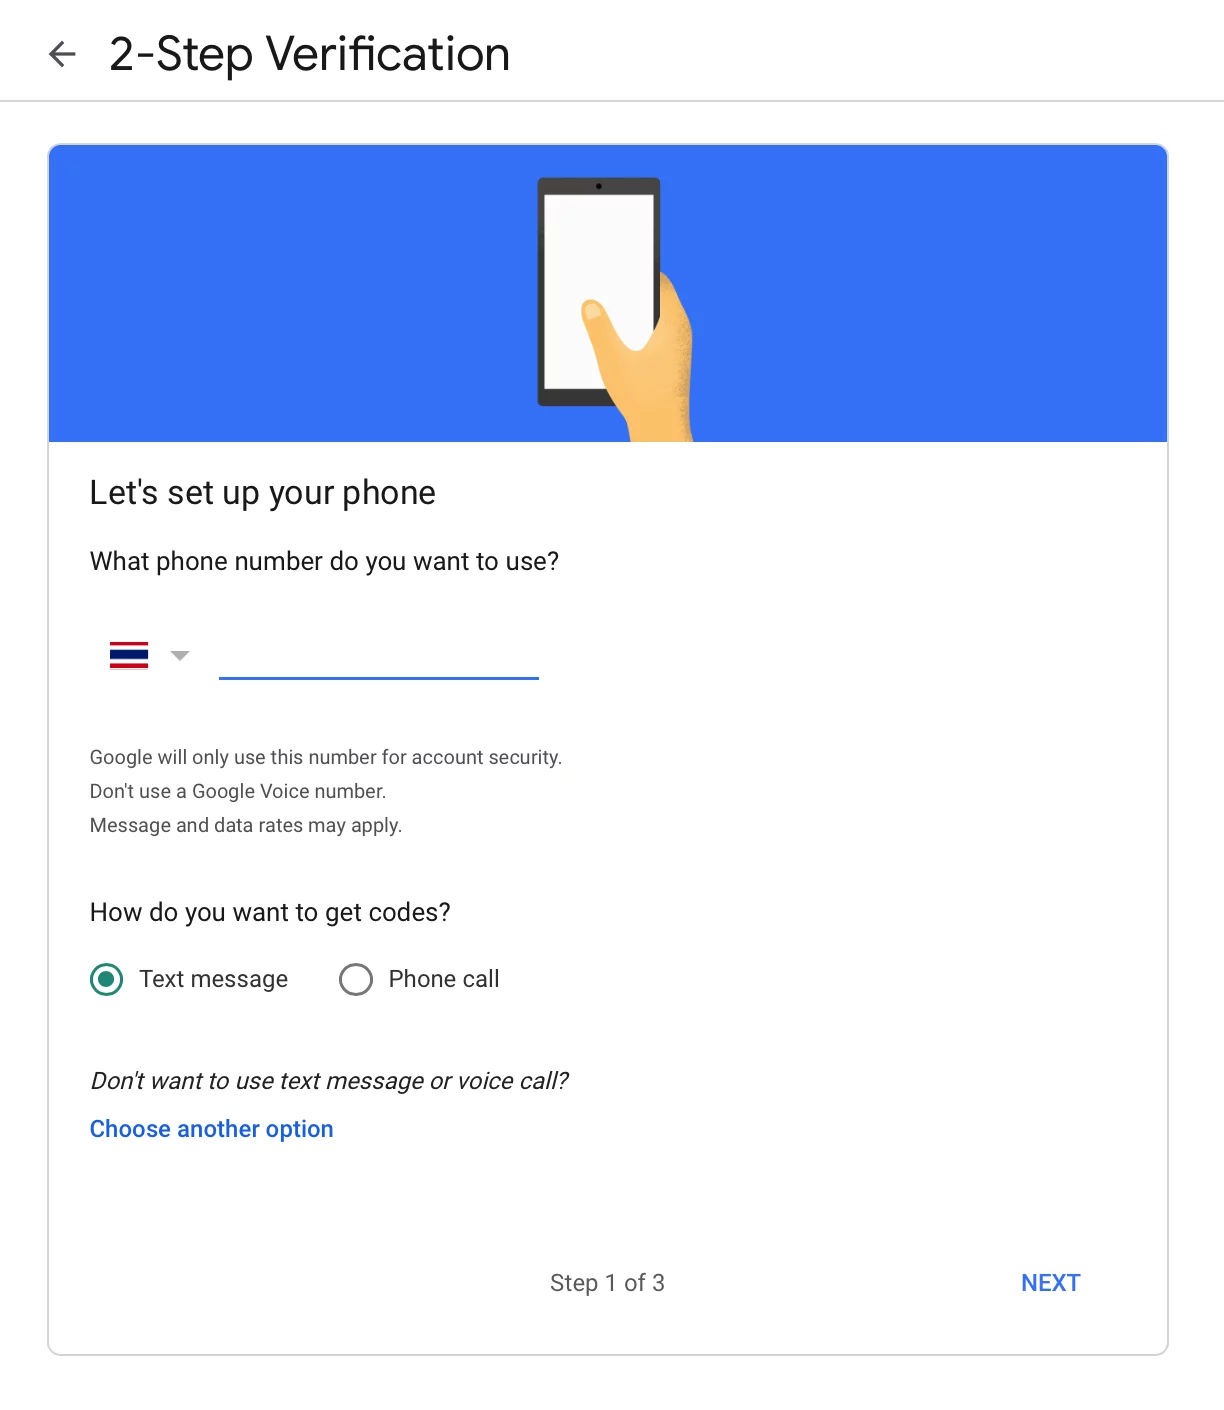
- ขั้นตอนนี้ระบบจะส่ง Code เข้ามือถือ ให้กรอก Code ที่ได้ในหน้านี้ แล้วกด Next หรือ ถัดไป
- สุดท้ายให้กดปุ่ม TURN ON เพื่อเปิดใช้งาน
3. App Password
สำหรับการใช้งาน App passwords คือการสร้าง password เฉพาะสำหรับ Application ที่เชื่อมต่อกับ บัญชี Google ของท่าน โดยใช้ได้ครั้งเดียว กับ Application ที่ท่านกำหนดเท่านั้น ในกรณีนี้คือ เชื่อม Gmail กับ Wisible เพื่อท่านจะสามารถรับ-ส่ง อีเมล์ ผ่านระบบ Wisible ได้ ซึ่งวิธีนี้ ถือว่า มีความปลอดภัยอย่างมาก เพราะ Password ที่สร้างขึ้นมานี้จะไม่สามารถนำไปเข้าใช้งานบัญชี Google ในช่องทางอื่นของท่านได้ โดยมีขั้นตอนง่ายๆ ดังนี้
- Sign In เข้า Gmail
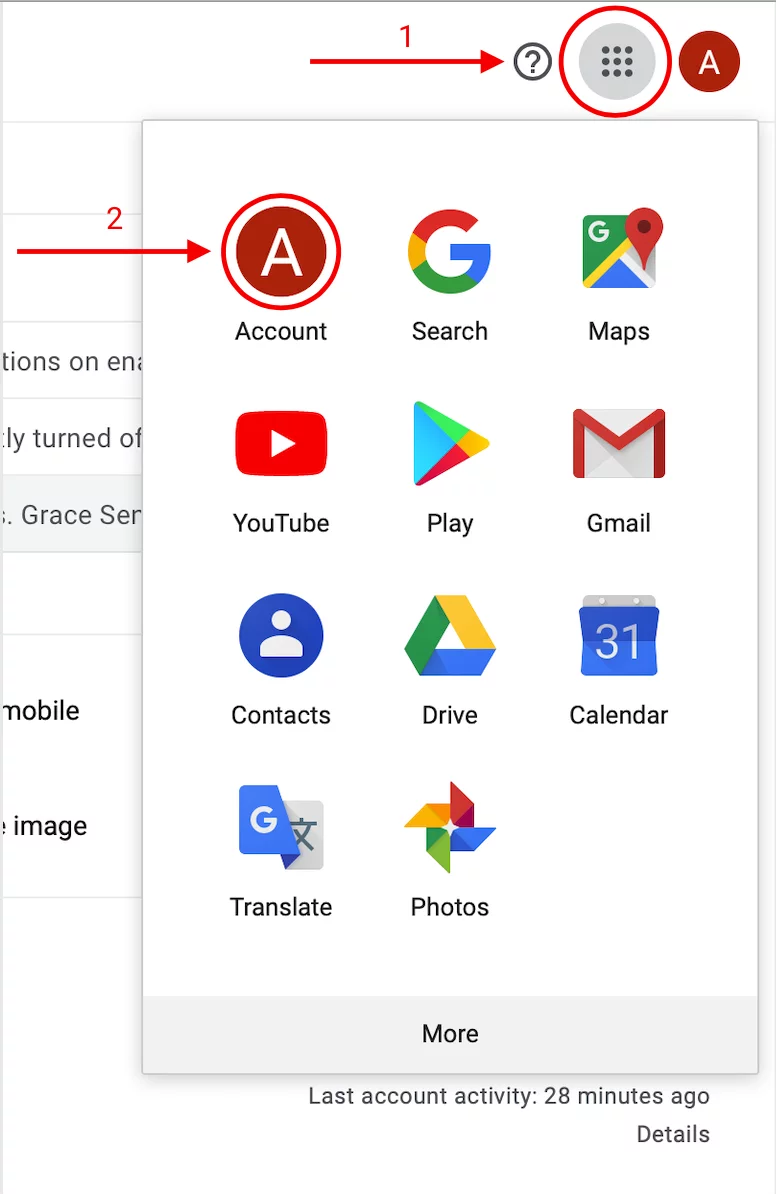
- กดที่เมนู 9 จุด แล้วกดที่ Account หรือ บัญขี Google
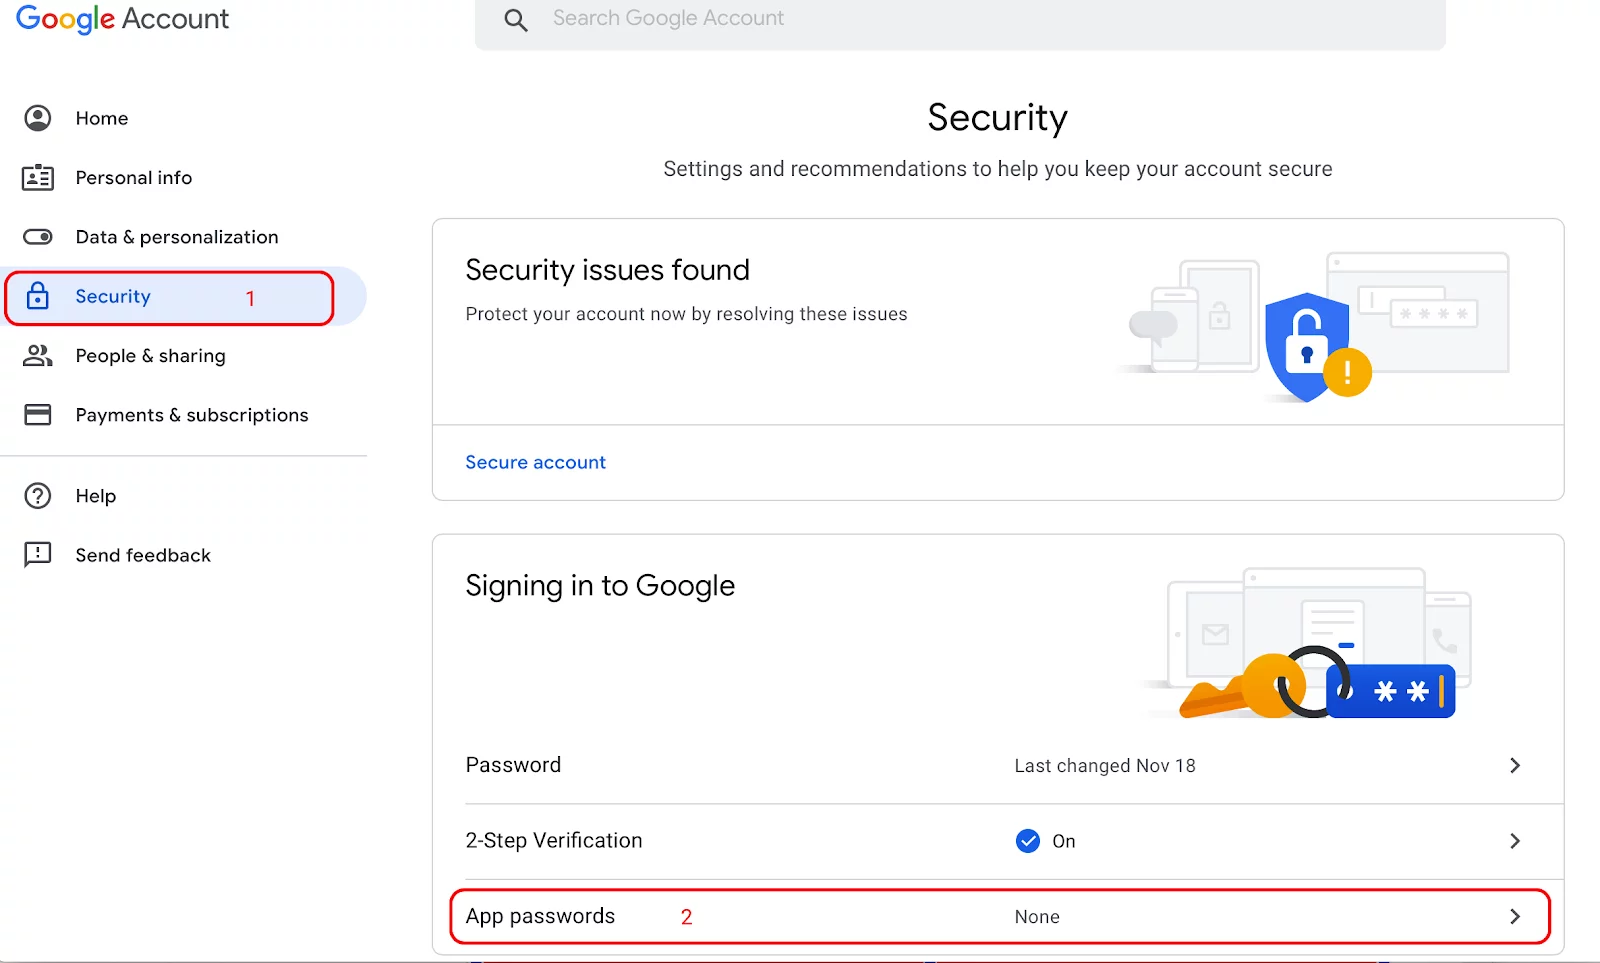
- หลังจากนั้น ให้กดที่เมนู Security ด้านซ้าย และกดที่ App passwords
- หลังจากนั้น ระบบจะให้ Signin และจะทำการส่ง verification code เข้ามือถือ ตามที่ท่านได้เปิด 2-Step Verification ไว้ เมื่อเรียบร้อยแล้ว ระบบจะนำท่านไปหน้า App passwords
- ส่วนนี้ ให้กด Select App และเลือก Other (Custom name)
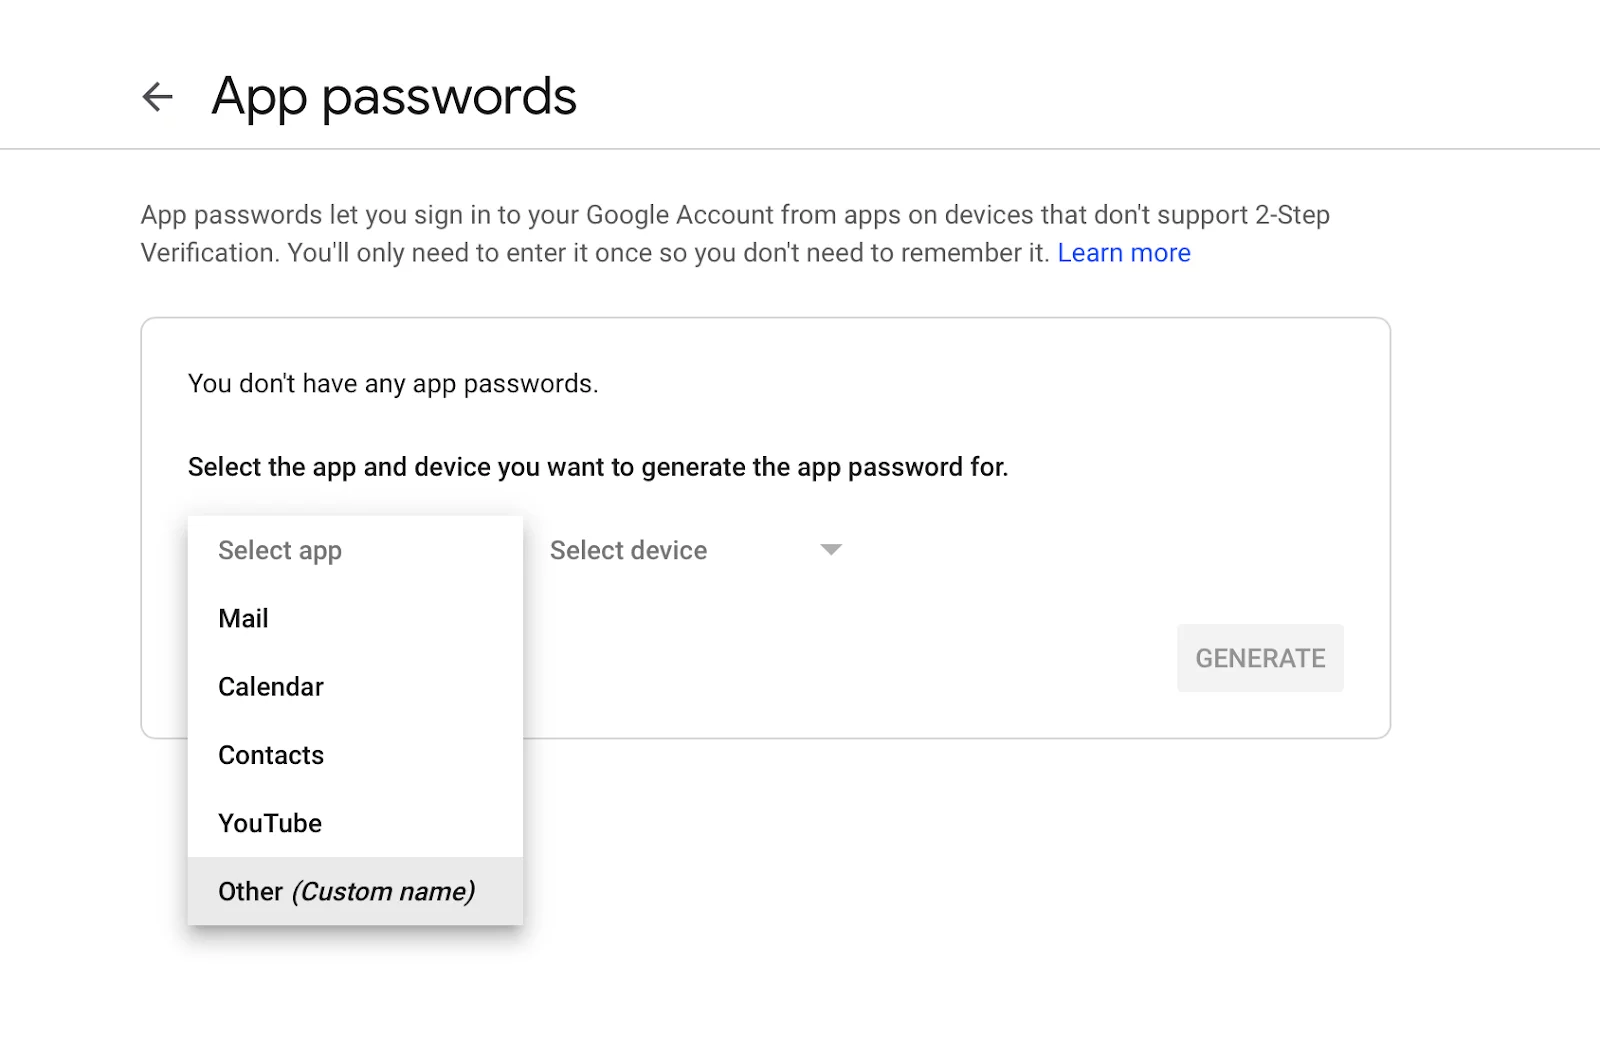
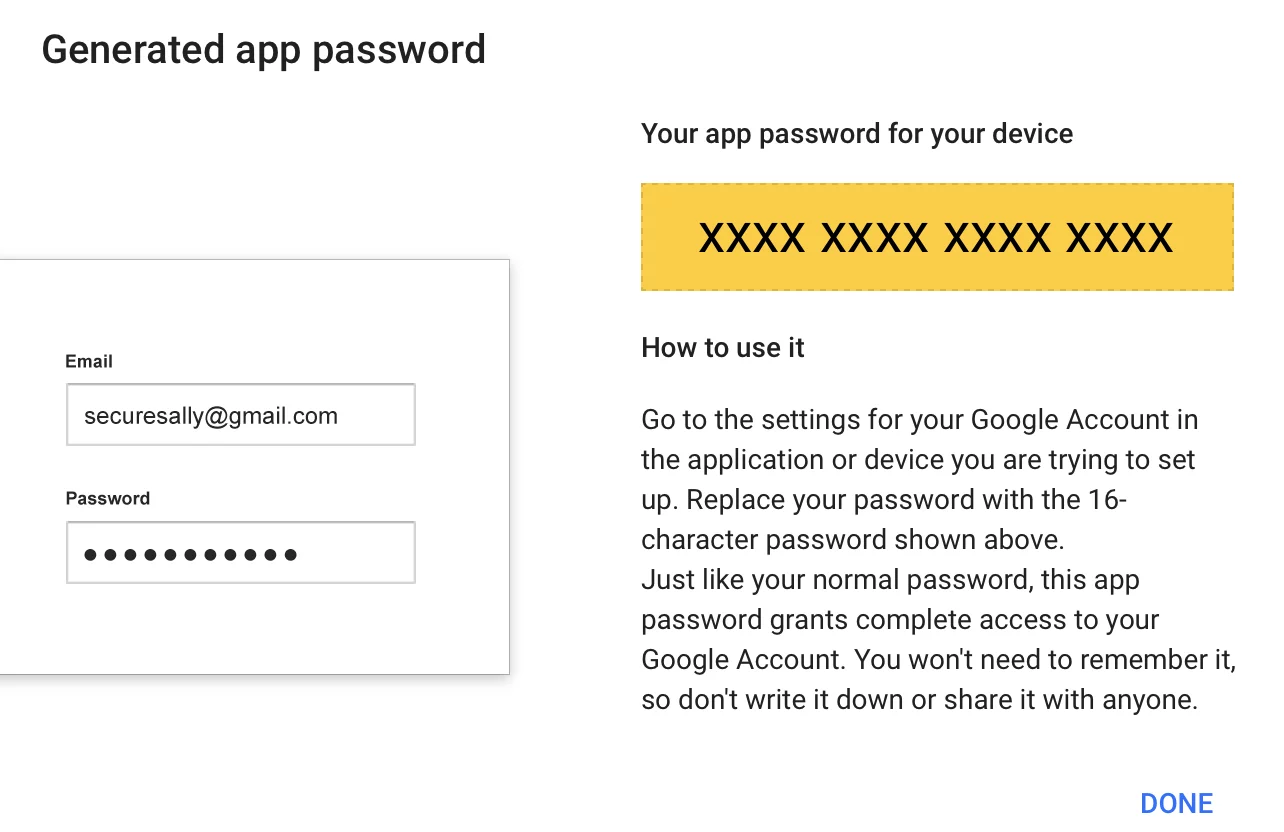
- ถัดไปให้พิมพ์ Wisible และกดปุ่ม GENERATE ระบบจะสร้าง password เฉพาะให้ท่าน copy password ไว้ เพื่อนำไปกรอกลงใน wisible เมื่อทำการ Sync email ต่อไป
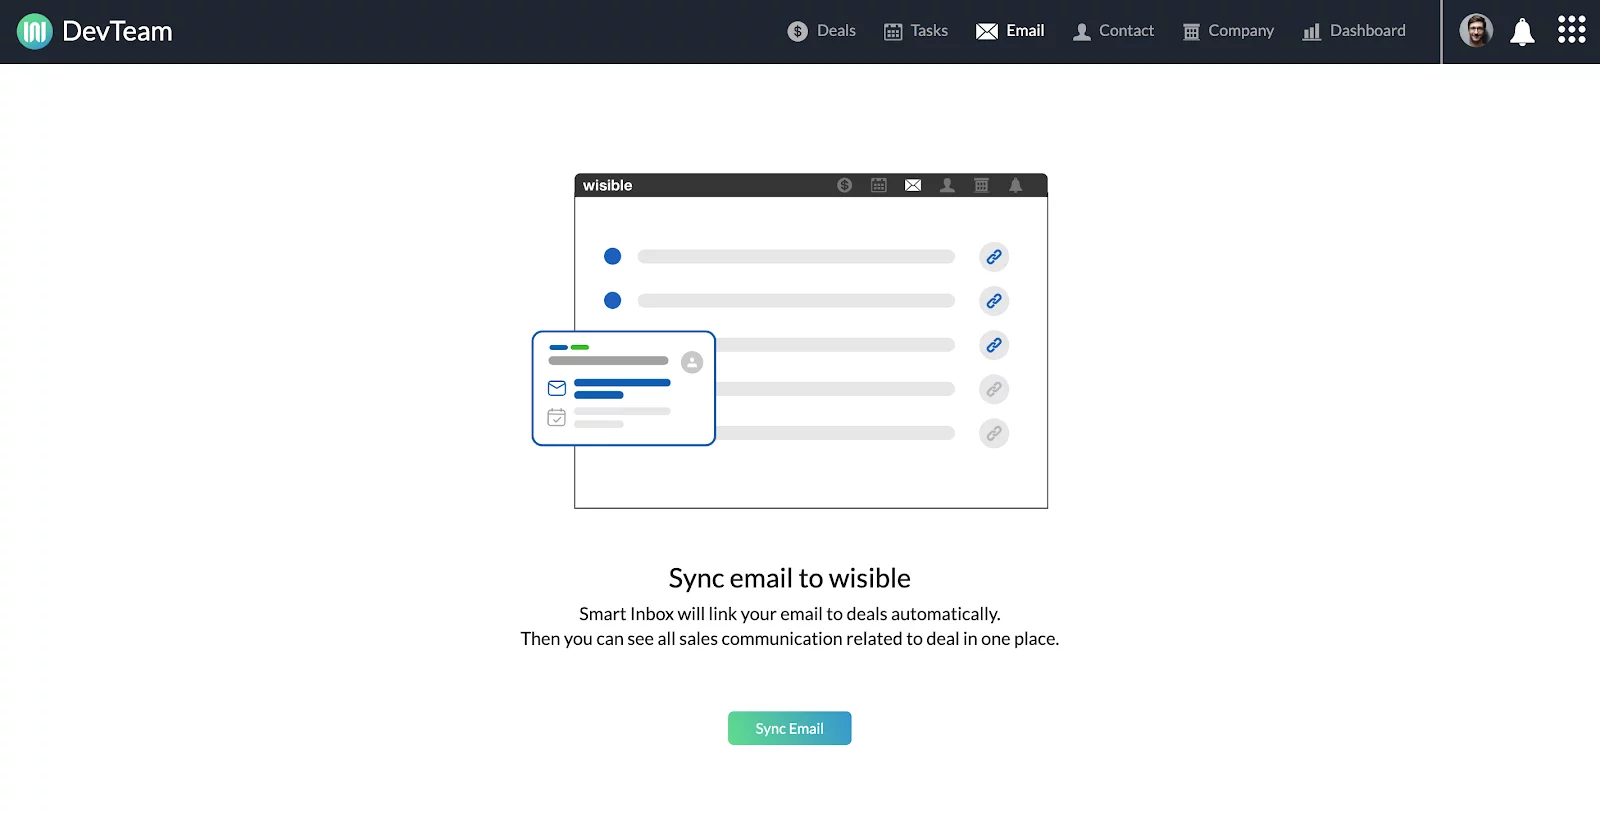
4. Sync email กับ Wisible
- ขั้นตอนสุดท้ายคือ เชื่อมการใช้งาน email กับ Wisible เพื่อการใช้งานและติดตามงานขายให้มีประสิทธิภาพมากยิ่งขึ้น ท่านสามารถรับ-ส่ง email จากใน Wisible ได้ โดยท่านเพียง Sync email ง่ายๆ ดังนี้
- Login เข้าใช้งาน Wisbile
- คลิ๊ก Email ที่เมนูบาร์
- กดปุ่ม Sync Email แล้วกรอก email และ password ที่ได้จากขั้นตอนที่ 3 เพียงเท่านี้ ท่านก็สามารถใช้งาน Email ใน Wisible ได้แล้ว