How To Connect Hotmail, Outlook In Wisible With Two-Step Verification

Share important files in each deal for more convenient collaboration

For anyone who is using email with Microsoft, you can connect to Wisible with Microsoft account as well which have 3 main steps as follows:

  1. Setting up by turning on 2-Step Verification
  2. Setting up by turn on App Password
  3. Sync email กับ Wisible

1. 2-Step Verification

To increase safety level and protect from any surveillance that might try to use your email, you can turn on 2-step verification by following these steps;
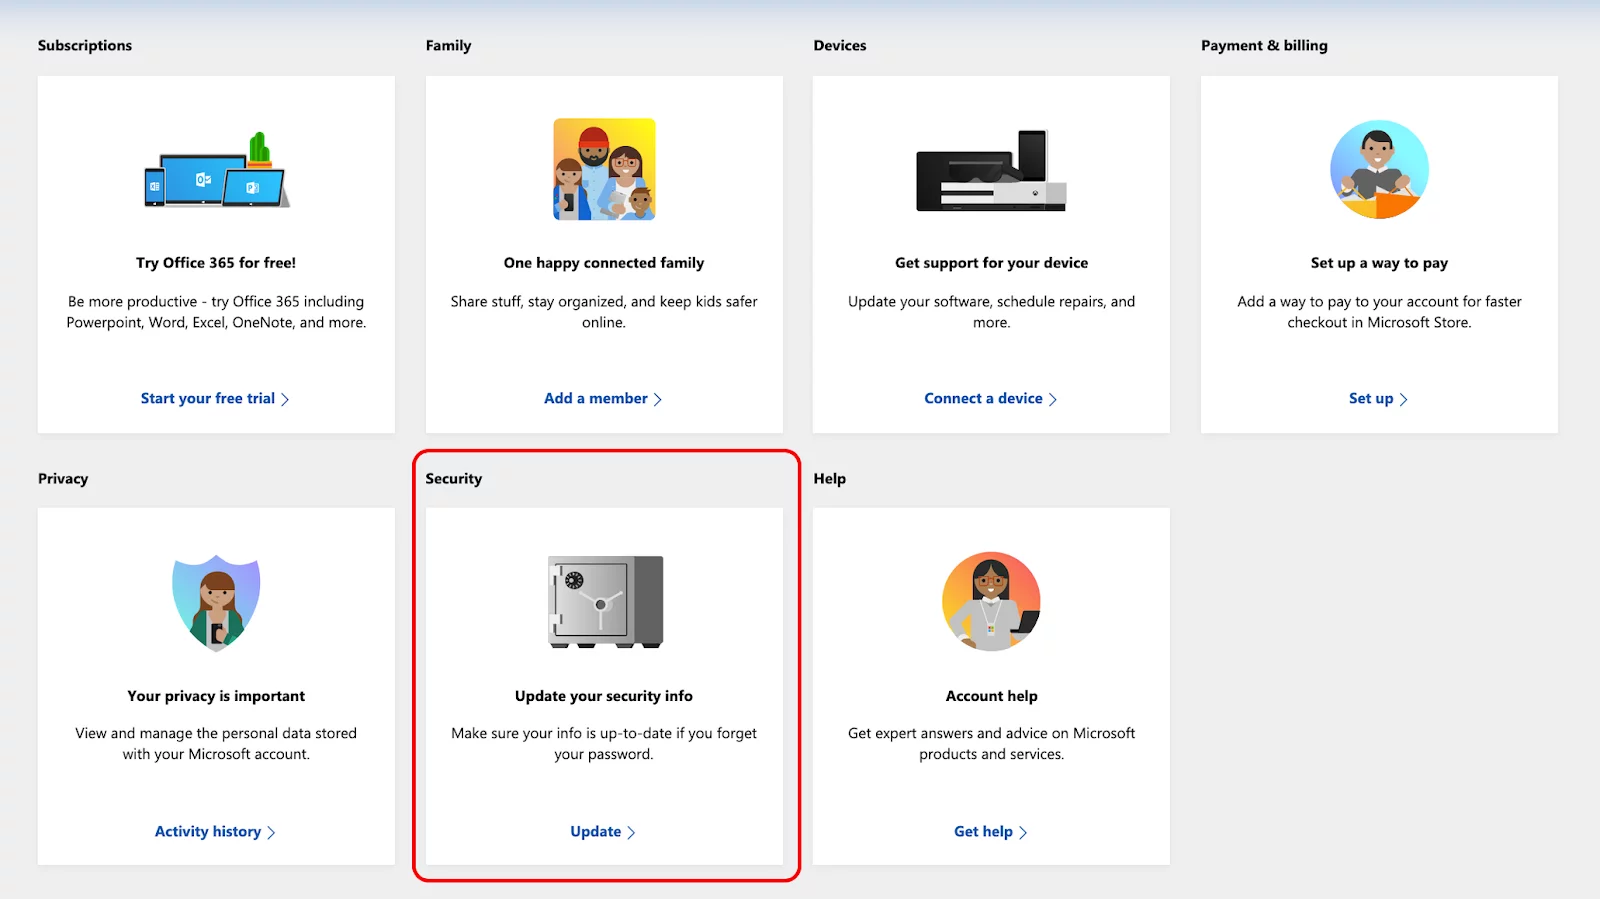
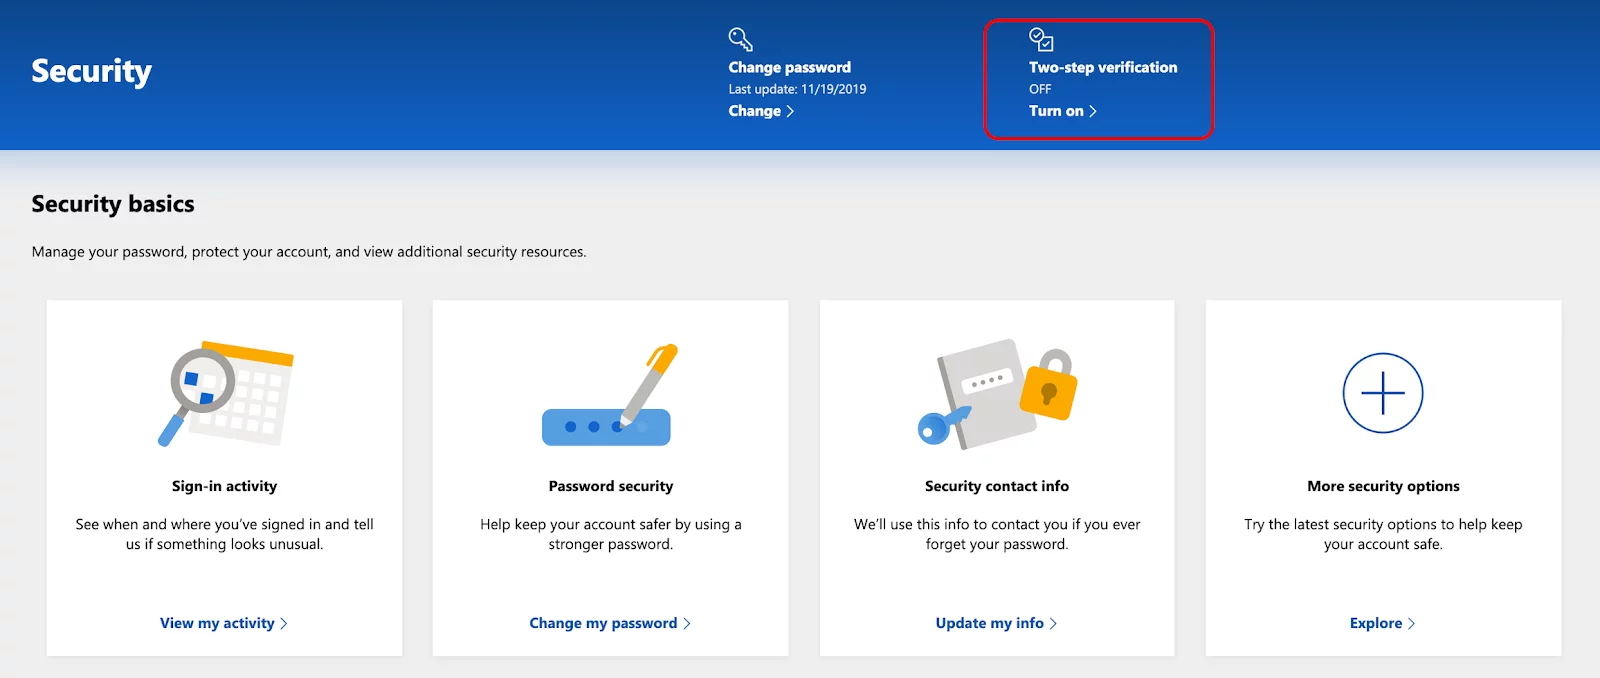
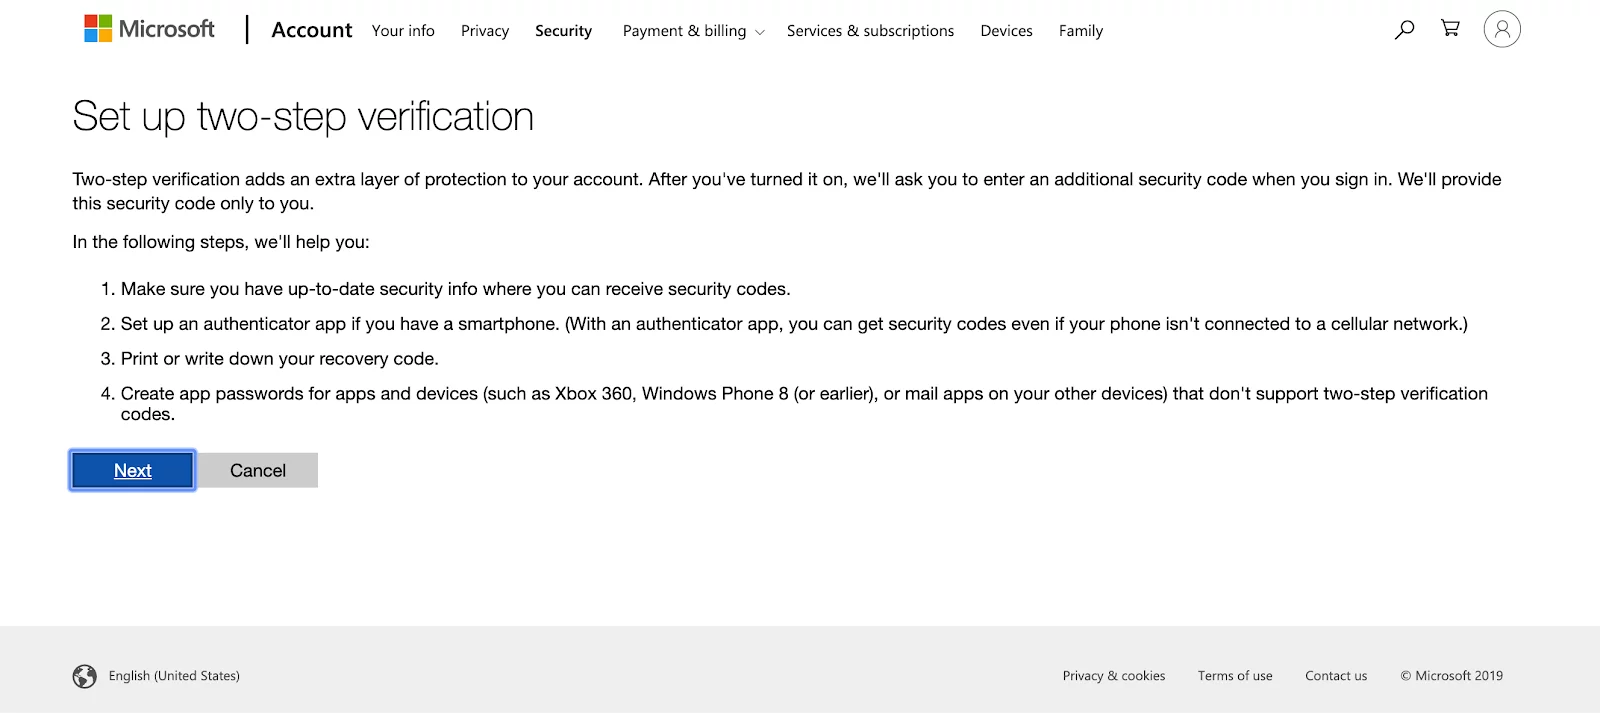
  • Then, click ‘Turn on’ at Two-Step Verification
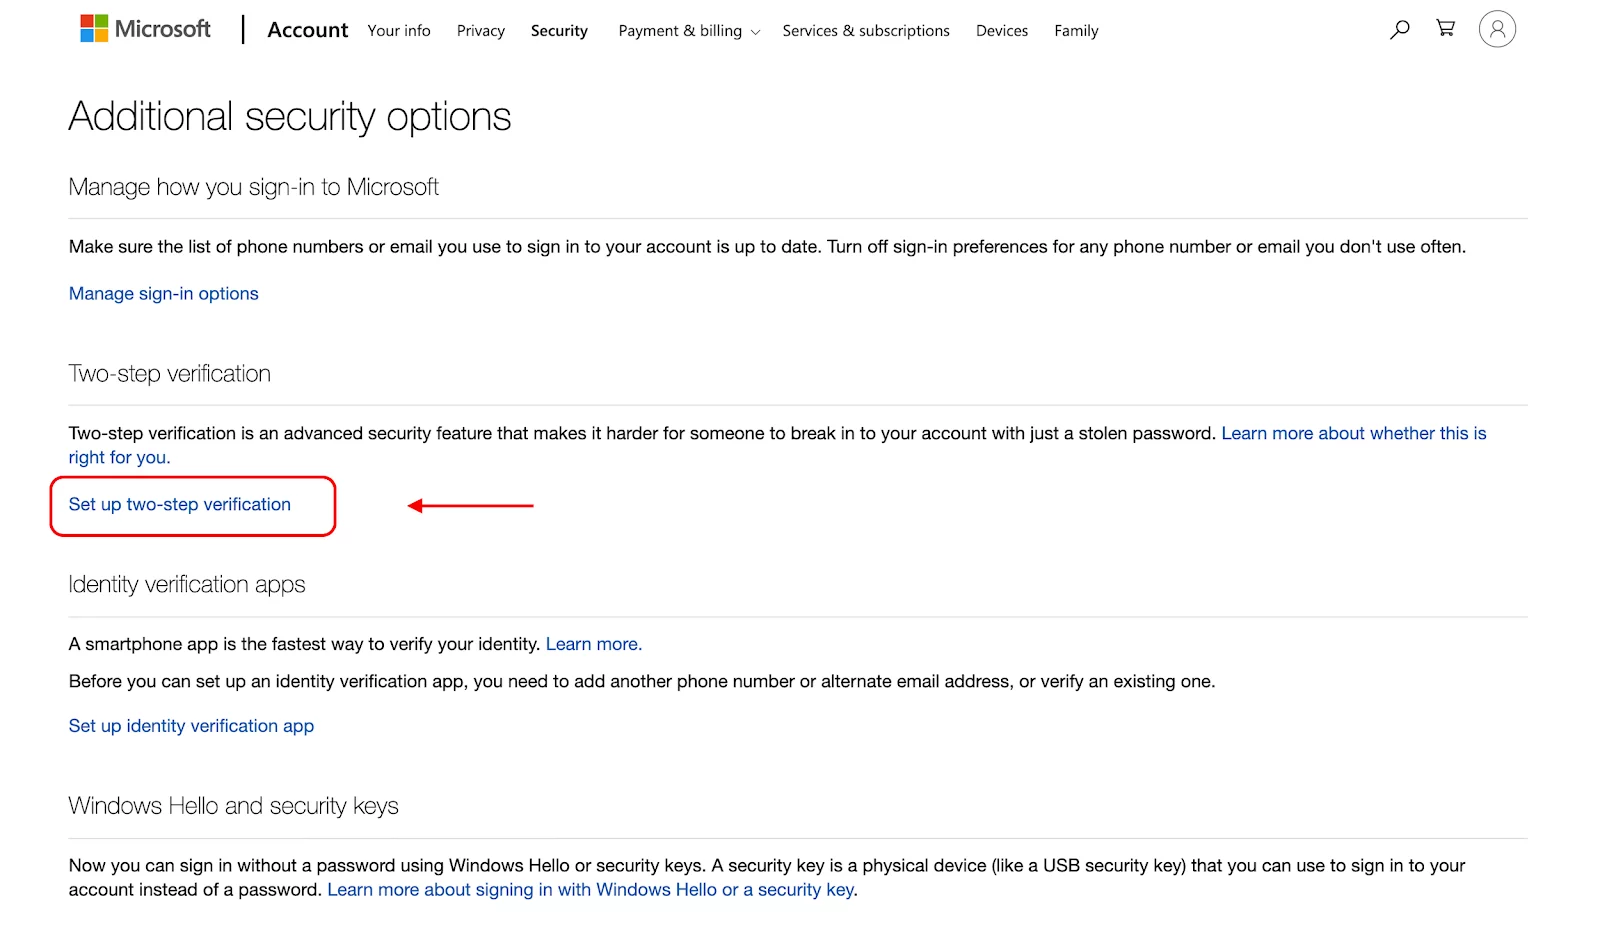
  • Choose Two-Step Verification
  • Sign in to your account, then click ‘Next’
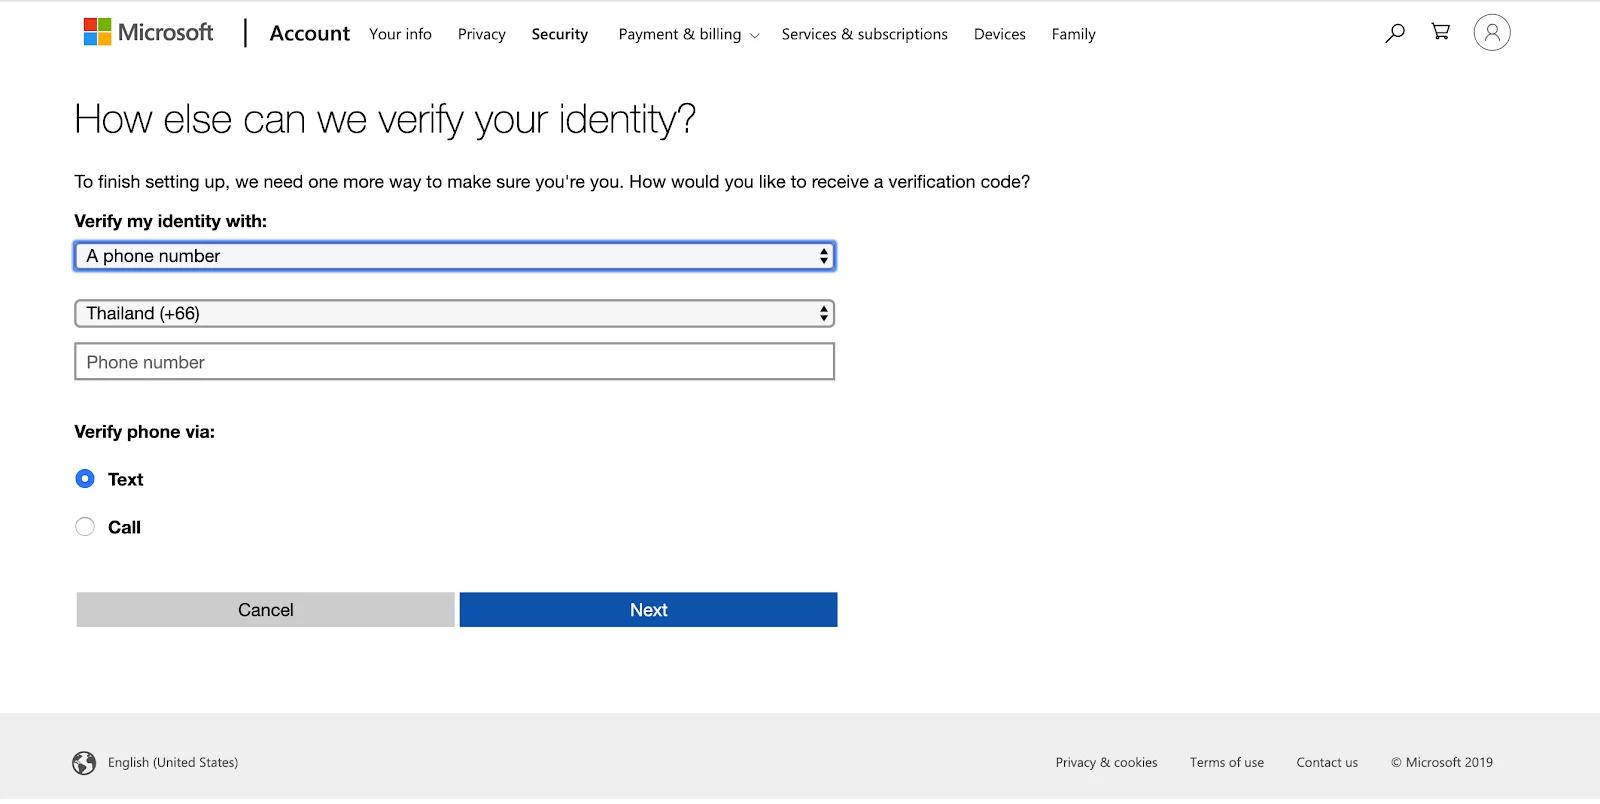
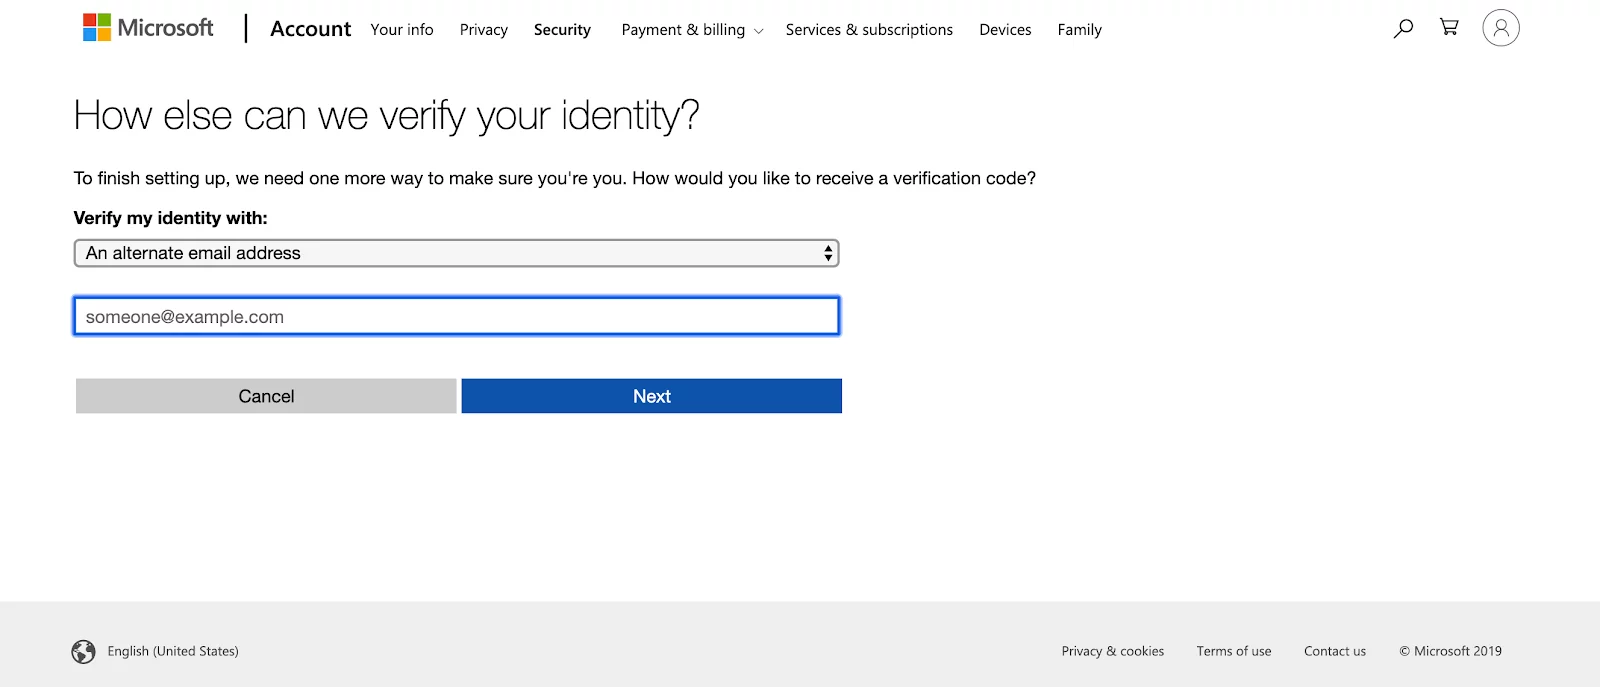
  • Click on the dropdown by choosing ‘identify by phone number’ or ‘identify by email’ then, click ‘Next’
  • The system will create a ‘Recovery Code’ for you to keep, in case there is any problem that you cannot access into your account. That’s it for turning on your 2-Step Verification.
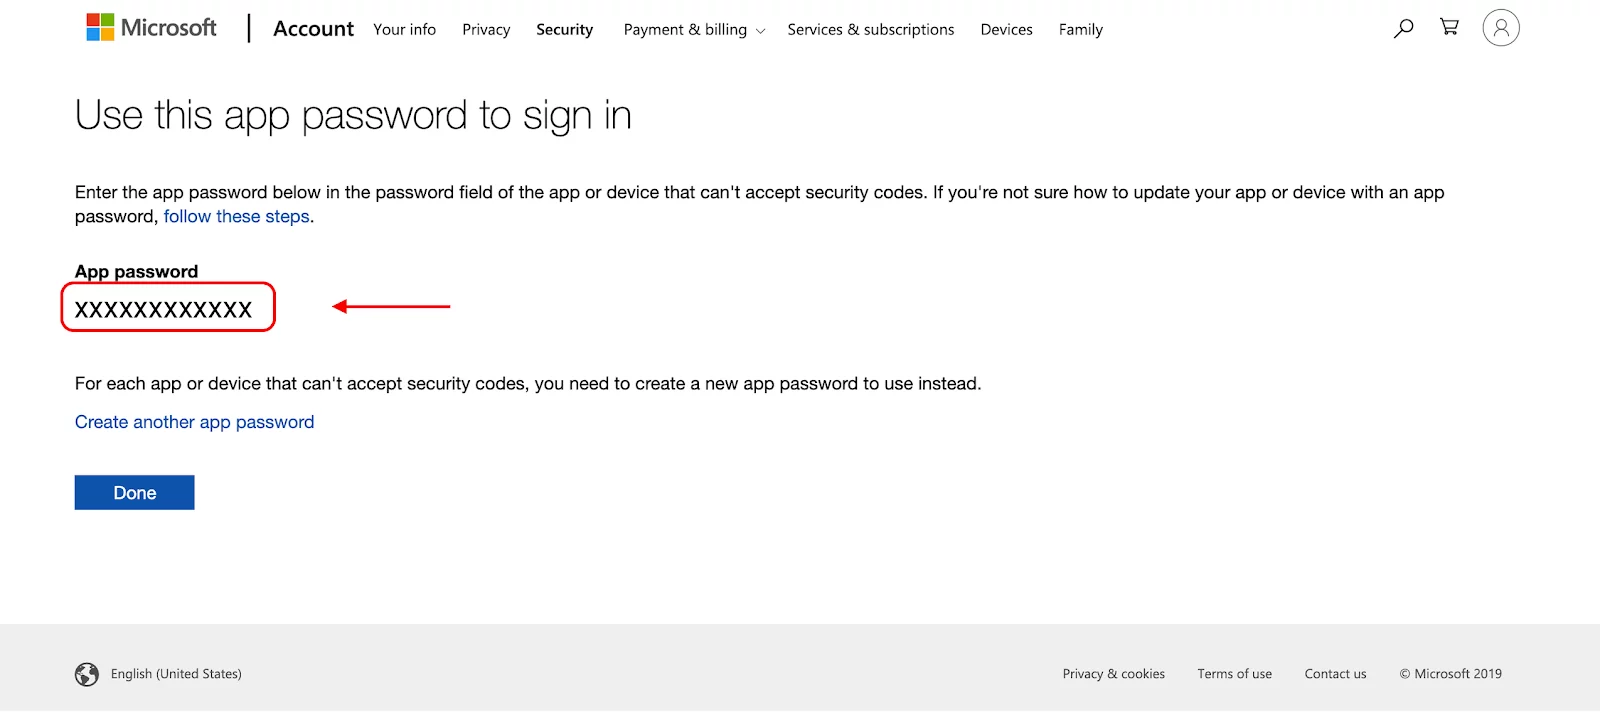
2. App Password

For using App Password, it is to create a password especially for an application that is connected with your Microsoft account. It is a one time password to be used with an application that you have set up. In this case, it is the connection between Wisible and Microsoft Account so that you can send and receive email via Wisible system. This method has high security because the password that has been created will not be able to be used in your Microsoft account via other channels. The steps are as follows:

  • Sign in to your Microsoft Account
  • In Security Page, under ‘App Passwords’, choose ‘Create a new app password’
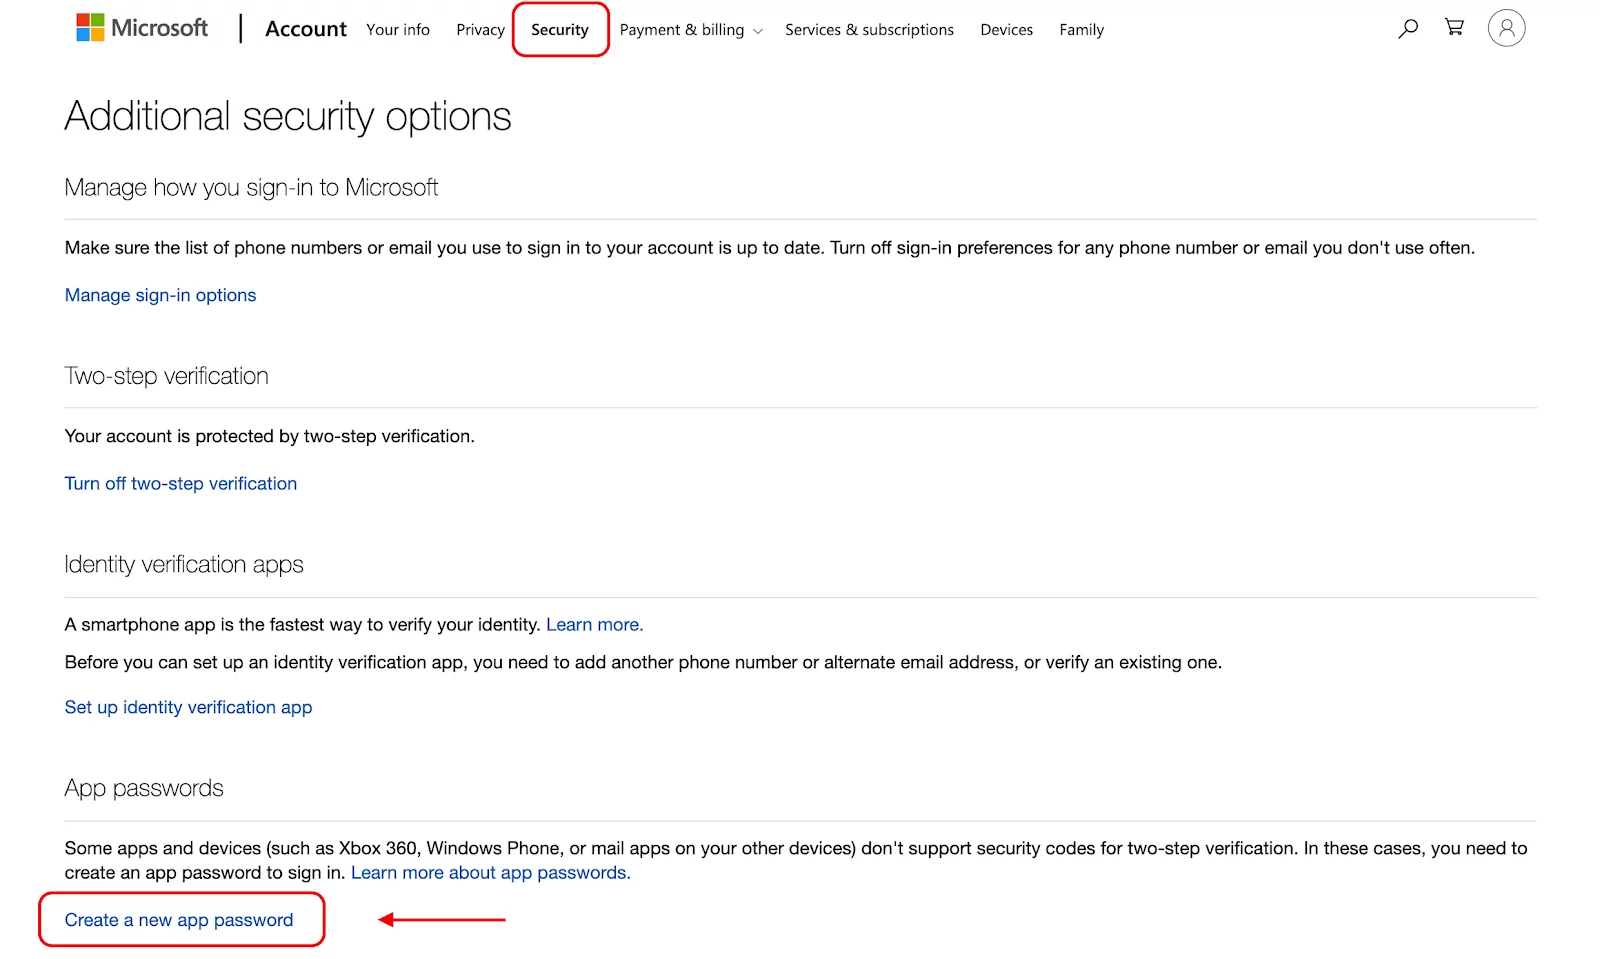
  • The system will create a password, you have to copy that password so that you can fill this password in Wisible when syncing with your email in the next step.

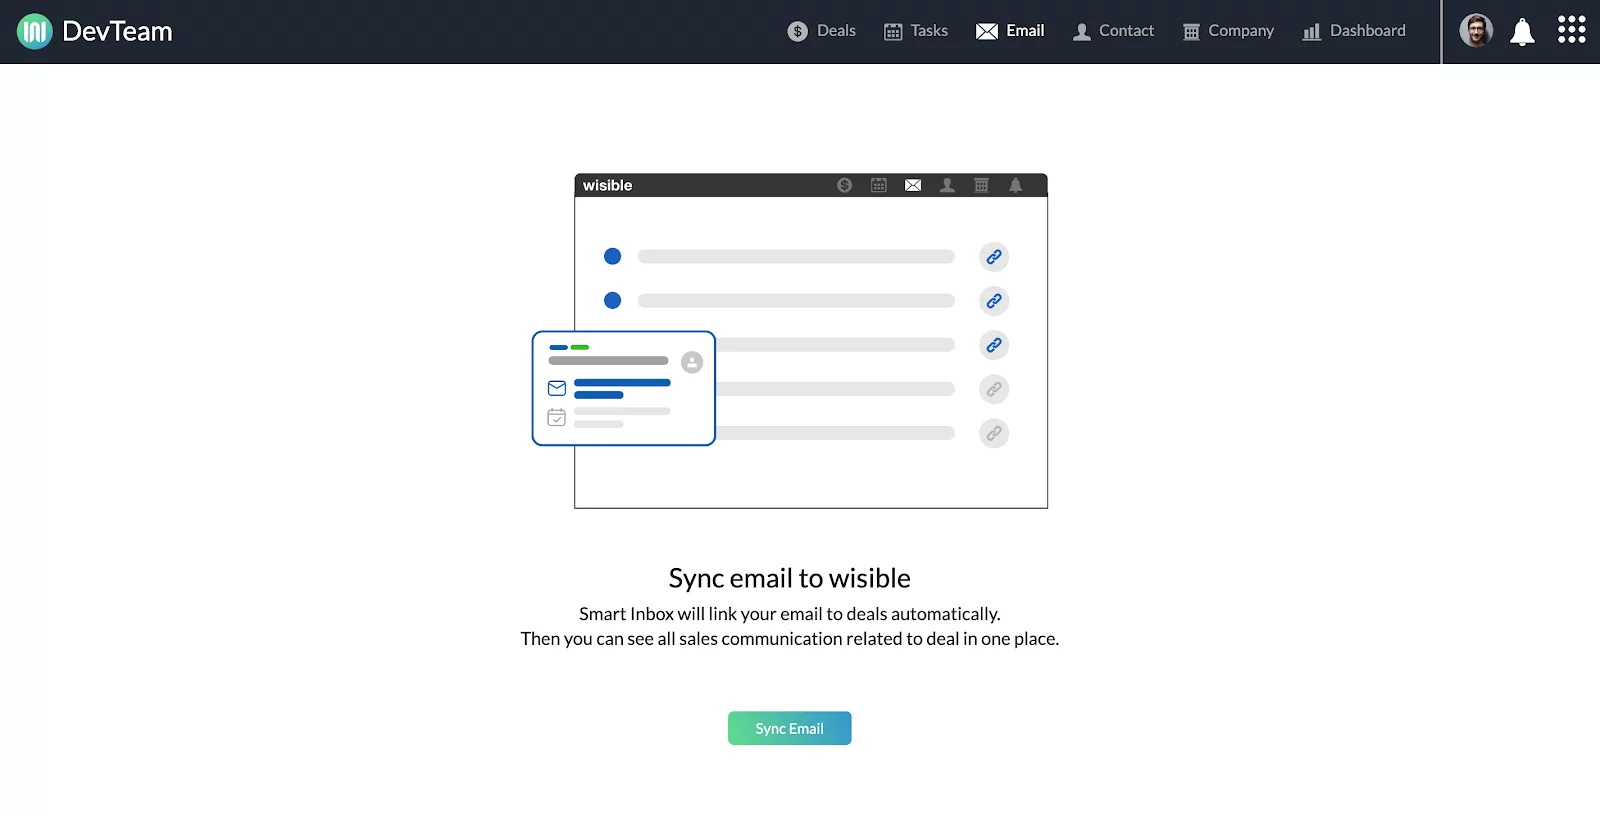
2. Sync email with Wisible

The last step is to connect the usage between your email and Wisible so that you can use and track your deals more efficient. You can send and receive emails in Wisible by just simply syncing your email as these steps: 

  • Login into Wisible
  • Click ‘Email’ at the menu bar
  • Click on the; Sync Email’ button and fill in your email and password that you have received from the 2nd step. With this, you will be able to use your email in Wisible.

Similar Posts

  • Setting Up for Quotation Usage

    To set up for Quotation Management Feature which is a special extra extension for working together with Master Product Feature so that your team can create a simple quotation by themselves by following these steps (For those who are using with Admin and Super Admin level only that will be allowed to set up this…

  • มอบหมายงาน เตือนความจำให้กับตัวคุณเองด้วย Wisible Line assistant

    นอกจากสร้างดีลใหม่ เพิ่มบันทึกย่อผ่าน Wisible Line assistant แล้ว คุณยังสามารถมอบหมายงานไว้เพื่อเตือนตัวคุณเองได้เช่นกัน เพียงกดที่ เมนู เพิ่มงานใหม่ (Add Task) ที่มุมซ้ายบรรทัดล่าง เลือกดีลที่คุณต้องการเพิ่มงานจากรายชื่อที่เราแสดงมาให้ และสามารถกด Show next deal เพื่อดูรายชื่อดีลเพิ่มเติมได้ จากนั้นใส่ชื่อของงานที่คุณต้องการจะให้เตือนความจำของคุณ เลือกวันเวลาที่คุณจะต้องทำงานนั้นให้สำเร็จ คำถามสุดท้ายจะปรากฏปุ่ม หากต้องใส่ note เพิ่มเติมให้พิมพ์ข้อความและกดส่งตอบกลับ หรือหากไม่ต้องการเพิ่ม note ให้กดที่ No เพื่อยืนยันการเพิ่ม task เมื่อเรียบร้อยแล้วคุณจะได้รับข้อความเเจ้งเตือนจากระบบว่าคุณได้สร้างงานเรียบร้อยแล้ว พร้อมกับข้อความรูปภาพที่คุณสามารถกดดูรายละเอียดของงานที่คุณสร้างไว้ผ่านปุ่ม View My Task ด้านล่าง ก่อนจะถึงวันเวลาที่กำหนดคุณจะได้รับข้อความแจ้งเตือนผ่าน Line อีกครั้ง เพื่อให้คุณไม่ลืมงานทั้งหมดที่ได้รับมอบหมาย ทั้งกรณีที่ทำผ่าน Wisible Line assistant และผ่าน Desktop อย่างแน่นอน

  • เพิ่ม note ของคุณ ผ่าน Wisible Line assistant

    หลายครั้งที่คุณอยากจะจดบันทึกสั้นๆ เกี่ยวกับดีลงานทันทีที่คุยเสร็จ หรือที่คุณนึกออก ครั้นจะจดใส่ในกระดาษ บางทีคุณก็ลืมที่จะนำมาพิมพ์สรุปอีกครั้ง แน่นอนว่าเราเข้าใจความต้องการนี้ นอกจากที่คุณจะสร้างดีลใหม่ผ่าน Wisible Line assistant ได้แล้ว เรายังมีเมนูเพิ่มบันทึกให้คุณด้วย เพียงกดเลือกที่เมนู เพิ่มบันทึก (Add Note) และเลือกชื่อดีลทีคุณต้องการจะเพิ่มบันทึกเข้าไป โดยเราได้เรียงมาให้แล้ว คุณสามารถกดที่ Show next deal ได้หากยังไม่พบชื่อดีลที่ต้องการ เมื่อเลือกดีลแล้วคุณสามารถพิมพ์บันทึกข้อความของคุณลงไปได้เลยทันที แล้วกดส่ง เมื่อกดส่งบันทึกของคุณแล้ว จะได้รับข้อความแจ้งเตือนจากระบบ ว่าคุณได้เพิ่มบันทึกเรียบร้อยแล้ว พร้อมแจ้งว่าคุณได้บันทึกอะไรลงไปที่ดีลใด ไม่ต้องง้อการจดใส่กระดาษเเล้วรอไปเพิ่มใน Wisible ภายหลัง เพียงเเค่เชื่อมต่อกับ Wisible Line assistant เท่านี้คุณก็สามารถส่งบันทึกย่อเพื่อเเจ้งทีมงานของคุณได้ตลอดเเม้จะไม่อยู่หน้าคอมพิวเตอร์ก็ตาม สะดวกสุดๆเลยค่ะ 😀